The Skeletons in Your Closet - And How to Decorate Them!

Have One Spooky Season of Fun With Our Great Skeleton Decor Ideas
Is it dead in here or is it just us? Cool skeletons really liven up your Halloween decor, so be sure to use some of our ideas for your next big bash, or as a creepy way to celebrate the night of spooks and scares!
We discuss types of skeleton decor, how to save money on your bigger-ticket items and give you a tutorial on how to creep up a cheap plastic skull for a professional end look. You'll also find all the best buys to scare up some savings this Halloween. Read on for bare-bones basics and devilish details on using skeleton decor.
Types of Skeleton Decor to Consider
Skeleton Halloween decorations are perfect because they're so versatile. Paper, cardboard, plastic, papier mache - you can find (or make) a skellie out of virtually any material, and for any price. This makes it ideal as a budget item too.
Here are some different types of skeletons you may want to consider for creeping up your house this year:
- Paper/cardboard - These are obviously your most economical choice. Often, these are jointed, giving them a vintage look. They're easy to put up and take down and are only a very small investment on your part.
- Skeleton Scene Setters - These are so inexpensive...not to mention oh so very cool! Use them to decorate a party area or for a haunted house walk-through for the local li'l monsters.
- Vintage décor - The big name here is Biestle. You may remember these from your own childhood, or at least have seen them around. The traditional Biestle cardboard skeleton is jointed and has something humorous to its look (a top hat, for instance). Beistle is still hot on the Halloween decor scene with modern offerings, but if you're looking for collectibles, do your homework and look for deals on ebay, or Google/Bing.
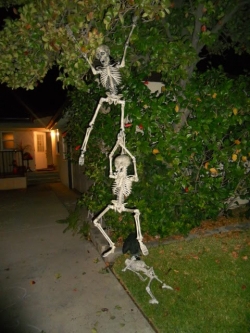
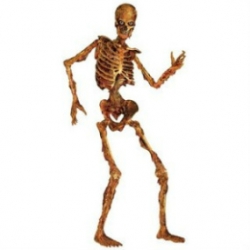
- 3-D jointed skeletons - Buckies/"Bluckies"/off-brands: Ask any hardcore Halloween fanatic you know: Buckies are THE skeleton for the serious haunter. The detail on these three-dimensional skellies is close to medical quality and they are fully posable. The real deal can get pricey, though. Check ebay and local sellers for knock-off brands (often called "Bluckies"). Also check out WalMart and local party supply outlets.
- Rubber/hanging skeletons - These come in all sizes and are a great, inexpensive and quick way to add some creepy atmosphere. Hang miniature rubber skellies from the ceiling around the party area; hang one or two above the front door to wiggle eerily in the wind on the night of tricks or treats. "Sit" one atop your computer or desk and hold in place with clear plastic twist-ties.
When searching for great skeleton décor, check out these reliable locales:
- Amazon.com (See a selection of products below)
- Online specialty party vendors such as CelebrateExpress.com or Shindigz.com (click the pic above for buying options on this skellie choice)
- Your local dollar or 99c store
- Local listings (like Craigslist.org), for giveaways or cheap sells
- Garage/yard sales
- Friends - you never know who's hoarding old Halloween decorations in the garage they never get around to using
- Thrift stores/consignment shops; Goodwill
- WalMart, Target and Walgreen's; save big bucks for next year by picking up post-season clearance specials
- Party stores like Party City or Spirit Halloween; again, look for clearance items

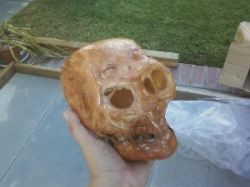
Make it Yourself: Corpsed-Up Skull
Care to take a guess how long it took us to create the corpsed-up mummy skull above? Five minutes! That's right -- this awesome, creepy skull is a quick project that only looks like it took a long time to do. Here's what you'll need, and how to creep up any plastic skull:
You will need:
- Inexpensive plastic skull, any shape you'd like
- Saran Wrap or bargain plastic wrap/cling film
- A heat gun OR a high-wattage hair dryer
- Any medium to dark color wood stain
- Paint brush or stippling brush
Directions:
1. Wrap the plastic skull several times all around with the plastic wrap. Make sure you've covered the entire head in at least 4-5 layers of plastic wrap.
2. Turn your heat gun on low and hold approximately 4" away from the wrapped skull. Move the gun QUICKLY over the skull so you get a feel for how quickly the heat is shrinking and wrinkling the plastic wrap. If you need more heat, turn the level on the gun to high.
3. For holes rather than just a wrinkling effect, hold the heat gun in place for a few seconds longer, but do NOT hold any heat source directly on one spot of your wrapped skull for more than 5 seconds. Too much concentrated heat, for too long a period of time, could melt part of the skull itself.
4. The skull will get HOT. Be very careful while holding the skull and applying the heat source. Keep the heat moving around to different areas. If you feel too much heat near your fingers, put the skull down and wait a few seconds for it to cool down, then continue.
5. When you have wrinkled and placed enough holes on the "skin" (the plastic wrap) of your skull, set it aside at least 5 minutes to cool completely.
6. Once cool, take your paint brush or stippling brush, and brush streaks all over the surface of the skull. Don't worry about darker/lighter areas; these will add realism.
When you're satisfied with the look of your painted skull, set it aside to dry completely (about 5-15 minutes). Then...enjoy!
Show Your Bones this Halloween!
Bag o' Bones for Halloween!


")